

FTTR from the Operator’s Perspective: Revenue Engine or Logistical Nightmare?
Let’s be honest for a second. The broadband market has hit a saturation point. We have successfully run fiber to the home (FTTH) for millions of customers, yet we are still dealing with churn. Why? Because the customer doesn’t blame their thick concrete walls for bad Netflix buffering, they blame us.
For operators and contractors, FTTR (Fiber to the Room) isn’t just a cool gadget. It is a strategic pivot from selling
bandwidth to selling “experience.” But is the operational headache worth the ARPU (Average Revenue Per User) uplift?
I’ve dug into the technical and operational realities to see if this stacks up.
The Business Case: Why Bother with the Last 10 Meters?
If you are an ISP executive, you are looking at the balance sheet. Installing FTTR is expensive—often 3x to 4x the cost of a standard FTTH drop. So, where is the ROI?
1. Customers Won’t Leave (Churn Rate)
This is the biggest selling point. Once you have glued transparent fiber along a customer’s baseboards and melted it into their doorframes, you are physically embedded in that property.
Replacing an FTTR system is messy. Unlike swapping a mesh node, removing adhered fiber is a renovation project. This creates a high barrier to exit for the customer. Early data suggests that premium service tiers like FTTR can reduce churn significantly because the user experience is genuinely better, and the “hassle factor” of switching is high.
2. We can Charge More Money (ARPU)
You can’t just sell speed anymore; gigabit is becoming a commodity. FTTR allows you to sell a “Premium Home Network” Service Level Agreement (SLA).
Operators in mature markets (like China Telecom or huge players in the Middle East) are bundling FTTR with management apps, charging a monthly premium of $10–$20 on top of the connection fee. It moves the conversation from “How fast is my pipe?” to “How perfect is my coverage?”
The Technology: Simple Explanation
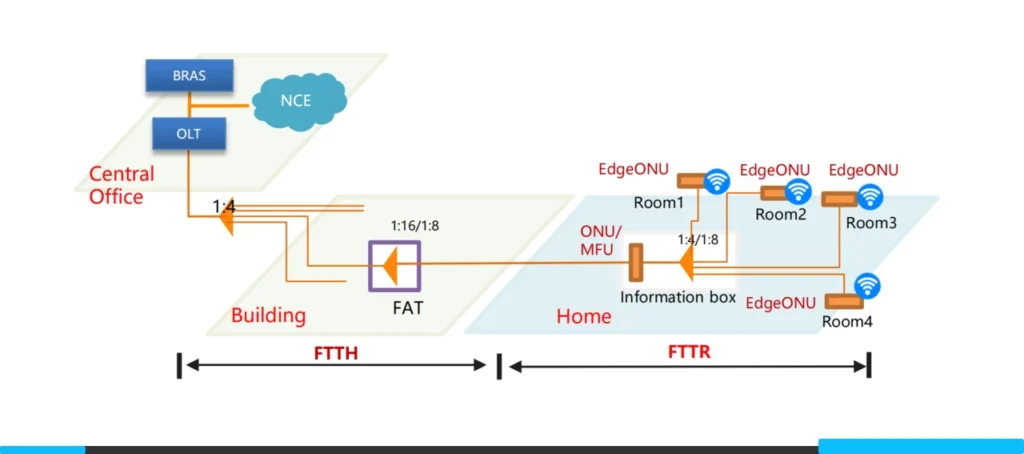
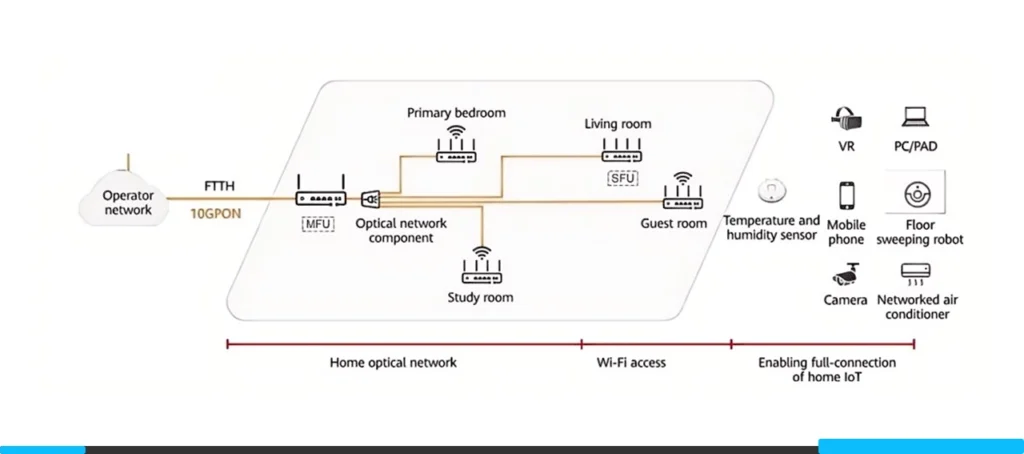
For the engineers out there, FTTR is essentially shrinking the PON network to fit inside a single apartment.
It typically uses a P2MP (Point-to-Multipoint) architecture.
The Master Unit (Main ONU): connect to the OLT outside. Ideally, it acts as a mini-OLT inside the house.
The Slave Units (Edge ONUs): connected via optical splitters or cascaded fiber chains.
The beauty here is the link budget. Unlike Wi-Fi mesh backhaul which degrades over distance and through walls, the optical budget on these short indoor runs is negligible. You get true line-rate throughput at the edge. However, itusually requires proprietary protocols for the handshake between Master and Slaves, meaning you are often locked into a single vendor (Huawei, ZTE, Nokia, etc.) for the entire home ecosystem.
The Installation Reality: A Contractor’s Challenge
If you run a contracting team, this is where you need to pay attention. FTTR is not a plug-and-play install.
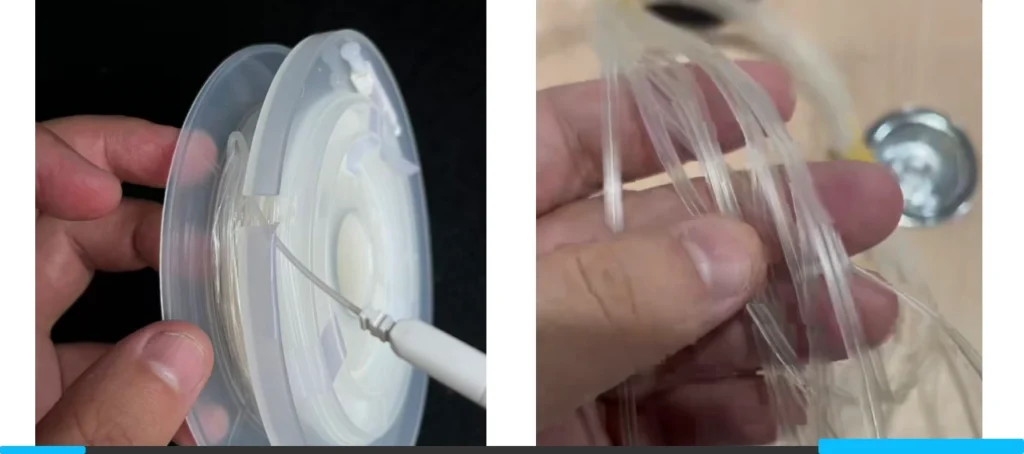
The “Invisible or Transparent” Fiber
We use specialized transparent optical cables. They are aesthetically pleasing but mechanically unforgiving.
- Bending Radius: While G.657.B3 fiber is bend-insensitive, it isn’t magic. Sharp 90-degree turns around door frames require precision corner protectors or careful hot-melt gluing.
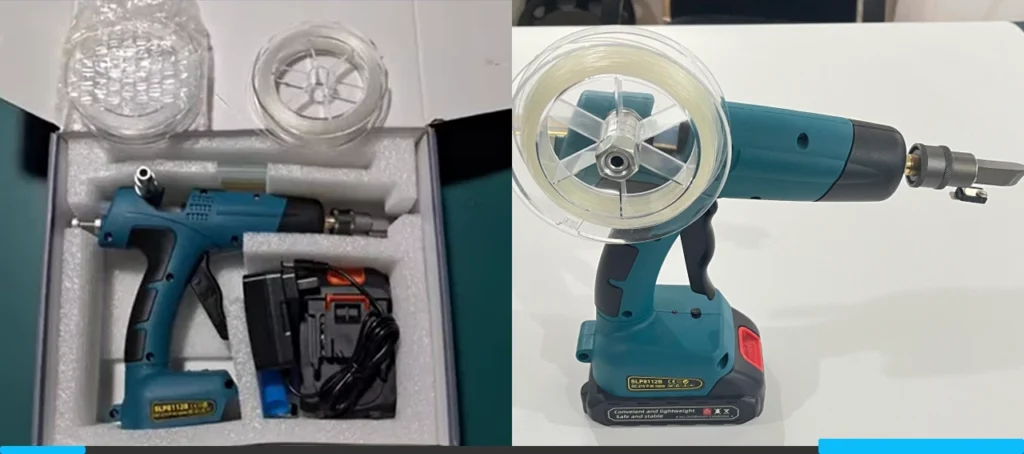
- The Tools: Your techs need new gear. We are talking about micro-splicing tools or specialized “hot melt” guns that adhere the fiber to the wall. This isn’t a staple-gun job.
Time Per Unit
Standard FTTH activation might take 45 minutes. A 1-Master + 3-Slave FTTR setup? You should budget 2 to 3 hours for a two-person team, at least during the learning curve. You have to map the home, run the fiber invisibly (which takes patience), and verify signal levels at every endpoint.
If your techs are paid per job, they might hate this unless the compensation structure is adjusted.
Is It Ready for Mass Rollout?
If you are dealing with new builds (Greenfield), pre-deploying fiber conduits to every room is a no-brainer. It future-proofs the property.
For retrofitting existing homes (Brownfield), it is a niche premium product. It is perfect for:
- High-value customers in large concrete villas.
- SME (Small/Medium Enterprise) offices where running CAT6 is too disruptive.
However, until the installation time comes down and the “invisible or transparent fiber” application becomes idiot-proof, this won’t replace standard Mesh Wi-Fi for the mass market.
My take? Start a pilot program for your top 1% tier users. Train a specialized “White Glove” installation team. Don’t push this on your standard contractors yet, or you’ll drown in revisit tickets.
SOP: FTTR Deployment Checklist
Target Audience: Field Technicians / Installation Engineers Goal: Zero-defect installation, seamless roaming, and minimal disruption to home decor.
Phase 1: Pre-Departure (Warehouse)
Before you drive to the customer site, ensure you have the specific FTTR toolkit. Standard FTTH tools are not enough.
Tools & Materials Check:
- Transparent Fiber Reel: Check you have enough length (Standard is 100m+ per home).
- Hot Melt Glue Gun: Specifically designed for fiber cabling (not a standard craft gun).
- Fiber Cleaver & Stripper: High precision tools for 1.2mm invisible cable.
- Optical Power Meter (PON): Calibrated for GPON/XG-PON wavelengths.
- Corner Protectors: Clear plastic guides for 90-degree turns.
- Cleaning Kit: Alcohol wipes and dust cloth (Vital for wall adhesion).
- Shoe Covers & Drop Cloths: Mandatory for entering customer bedrooms/living areas.
Phase 2: On-Site Survey & Design
Do not start drilling immediately. Plan the route with the customer.
Customer Consultation:
- Wear Shoe Covers before entering.
- Walk the Floor: Identify the location for the Master Unit (usually Living Room/TV area) and Slave Units (Bedrooms/Study).
- “Before” Speed Test: Run a speed test in the furthest room to document the “before” state. Show this to the customer.
- Route Agreement: Show the customer exactly where the fiber will run (along baseboards, door frames). Get their verbal approval.
Feasibility Check:
- Locate existing power sockets for all units.
- Check for obstacles: Are there sliding doors or tight gaps that might pinch the fiber?
Phase 3: Cabling Installation (The Critical Step)
This is the most difficult part. Patience is key.
Routing the Transparent Fiber:
- Clean the Path: Wipe the baseboards/cornices with alcohol to remove dust. If it is dusty, the glue will fail in 1 month.
- Apply Adhesive/Glue: Run the hot melt gun slowly. Ensure the fiber is tight against the corner.
- Corner Management: When turning a corner, use a Corner Protector or ensure a smooth loop.
Warning: Do not bend the fiber to a hard 90-degree angle. It will break the light signal.
Door Crossing: If crossing a door frame, run the fiber over the frame, never on the floor where it can be stepped on.
Termination:
- Strip and Cleave the fiber ends.
- Install the ATB (Access Terminal Box) / PTO (Premise Terminal Optic)or invisible wall socket.
- Safety Check: dispose of fiber shards (glass scraps) in a sealed container. Do not drop them on the customer’s carpet.
Phase 4: Device Activation & Testing
Now we light it up.
Power Up:
- Connect the Master Unit to the OLT (ISP feed).
- Connect Slave Units to the newly installed fiber.
Optical Signal Check (Crucial):
- Check Light Power: Use your Power Meter on the fiber end before plugging it into the Slave Unit. Acceptable Range: -15dBm to -25dBm.
Fail: If it is lower than -27dBm, you have a bad splice or a tight bend. Re-do the cabling.
Configuration:
- Allow the Master Unit to auto-discover Slave Units.
- Ensure Wi-Fi SSID and Password are synced across all nodes.
Phase 5: Verification & Handover
Prove the value to the customer.
The “Walk Test”:
- Connect your phone to the Wi-Fi. Start a video call (or use a roaming test app).
- Walk from the Master Unit room to the Slave Unit room.
- Goal: The video should not freeze. The handover latency should be under 50ms.
Customer Education:
- Show the customer the “After” speed test in the bedroom (Target: >500Mbps).
- Help them install the Management App on their phone.
- Cleanup: Remove all dust, wire clippings, and packaging. Leave the house cleaner than you found it.
| Problem | Likely Cause | Solution |
|---|---|---|
| Red Light on Slave Unit | No Optical Signal | Check for broken fiber or bad connector. |
| Speed is low (<100Mbps) | Dirty Connector | Clean the fiber tip with a click-pen cleaner. |
| Glue peeling off | Dusty Wall | Re-clean wall with alcohol and re-glue. |
| High Latency | Bad Splicing | Re-terminate the fiber ends. |
Want to print this SOP for your team?
We have prepared a clean, printable PDF version of this FTTR installation checklist.
Get the PDF version here.